Original Link: https://www.anandtech.com/show/1086
ClearPC, C3 and BeanTech: The Clear Chassis Comparison
by Kristopher Kubicki on March 15, 2003 3:14 AM EST- Posted in
- Cases/Cooling/PSUs
Introduction
Clear enclosures have stirred a following in our forums and retailers around the internet. Some of these people have legitimate uses for a clear cases; educational examples, demonstration products, etc. However, the majority of people who seem to really jump all over the clear cases are the enthusiasts. More specifically, they are ultra enthusiast; also known as the small breed of users that are completely infatuated with any gadget that gives that “Wow! Cool!” impression.
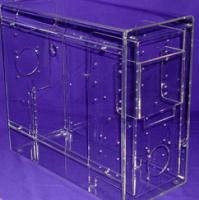
No less than half a dozen clear chassis debuted at places like COMDEX, and after a few months there seems to be two or three that set the trends for this highly specific market. The first clear case we will be looking at is ClearPC.ca’s ClearPC tower. This case has been one of the first to market, but also one of the cheapest available. Since it is not a kit, and you can customize the case right on the ClearPC.ca website, a lot of people have been using it as a one stop shop for modding.

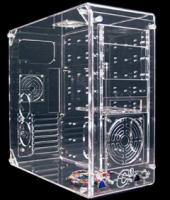
Our second contender in our clear chassis mach-up is the C3 case, also known as “Clear Computer Case”. C3 has a little more variety than ClearPC, but we will only be reviewing their base model case. The C3 has been called the more “high end” acrylic case on the market, so we have a lot of expectations for this case.
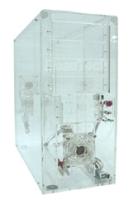
Last but not least, we obtained a newer revision of the BeanTech enclosure. Even though this case may have a funny name, it carries a very practical and intricate design. With a street price somewhere between the C3 and the ClearPC, we designated this as the “middle of the road” clear chassis.
Clear enclosures have not attracted many reviews, but the elements discussed in this review are similar for many clear enclosures on the market. Even if you are not considering any of these enclosures, you may find some of the things to look for in your clear case to be similar. You may notice we did not review any kits in this review. Since the kits are retailing for about the same price as the already constructed units, we decided to pass them up this time around.

Overview
As we mentioned earlier, there are several things to look for in a clear chassis independent from the specific models we are analyzing today. Here are the major items you should look for:
Assembly: Most manufacturers will label very clearly if the acrylic is molded. Unfortunately, the English language permits two very different interpretations of this word. The highest quality acrylic components are assembled from liquid acrylic being poured into a mold. This results in no stress fractions and typically comes with the highest price. ‘Molding’ also refers to the process of bending a warmed acrylic sheet to create the structural components of the case. Typically, the latter instance is what manufactures refer to on their product sheets.
Cut: About half of the clear cases we have seen are laser cut, while the rest are cut with more conventional methods. When cutting acrylic, traditional cutting techniques employed on steel and aluminum become practically unless. If heated too much, the Lucite or other material melts down to a resin, which often beads and bubbles creating uneven cuts. If you see bubbles on the edges, you can be pretty sure the case is not laser cut. The truth holds visa versa as well; if you see a case that does not mention it is laser cut, it most likely will have bubbles in the construction.

Bay mounting: Again, about half of the clear chassis we have seen (and not just the ones in this review), employ a single 5.25” bay column in the front. Usually, this entire bay is removable in order to allow you to mount 3.25” devices with the aide of metal extenders placed in between the bay walls and the drive itself. While practical, this method generates excessive work.
Cleaning: With any clear case, cleaning your case will soon constitute a new level of importance. Our lab may not be the largest marvel of tidiness, but a stray fingerprint on the side of an acrylic case looks incredibly unsightly. Some cases come with rubber gloves for installation, but most do not. If you have a pair lying around, we suggest using them. A little bit of extra work during the installation goes a long way afterward.
ClearPC Construction
The ClearPC was the first case we received, and we were a little surprised at the construction because it is truly like nothing we have ever seen before. Our case came modified heavily, complete with LED fans, wheels, cleaning solution, and a few other goodies. We should note that many of these items do not come standard. However, we came to see that installing components on the ClearPC was not a walk in the park.

The first disappointment on the ClearPC came because there was no sort of removable motherboard tray. We have criticized a lot of cases in the past for not having a removable tray, and this should instance should not be an exception. If we had a single complaint about this case it would be the motherboard installation. Since there is no removable motherboard tray, and no anchored mounting holes, the motherboard has to be mounted using nuts and bolts.
We spent an excessive amount of time devising a way to properly mount the motherboard on the case. It turns out it was very difficult to do without two people. What complicates things the most is that the side panel opening seems to extend about a third up the side of the case. The bottom two bolts on the motherboard posed a serious problem for us, so we are hoping ClearPC can resolve some of the issues with mounting the motherboard in the next revision of the case.
On the positive side, there are no sharp edges in the case to cut a stray hand on. This is another golden rule we have at AnandTech, and we are very glad ClearPC was unable to find a way to make molded acrylic dangerous.
The expansion card bay proved to be the second challenge on this case. The acrylic on the ClearPC cannot be cut thin, so the engineers had to determine a way to hold the expansion cards in the slot using non-traditional methods. The final result came to be in the form of a second smaller opening over the expansion card bay that houses openings for thumbscrews. While this idea works in theory, there is very little clearance above the screw to get any leverage on the screws. This did not please us very much.

ClearPC Construction Continued
Forty-five minutes into the construction of our ClearPC case, we had only managed to get the motherboard and the expansion cards in the case. Granted, this could have been significantly quicker had we looked at the directions on the website. We were disappointed to see there were no thorough directions in the packaging of the case.

The ClearPC does not have designated 5.25” and 3.5” bays, but rather one large 5.25” bay. Essentially, the whole front panel comes out as one unit, so the drives can be mounted easily without any obstruction. It comes with 2 versions of mounting screws, so that you can mount 3.5” drives in the bay by using longer screws. Fortunately, the ClearPC does come with one 5.25” to 3.25” adaptor bay, so that a zip or floppy drive does not have to sit exposed.
Furthermore, the ClearPC also comes with a USB and Audio hub that can be re-aligned to any mount point on the 5.25” bay. This was a neat feature as most of the cases we have seen simply put the USB hub on the bottom of the case, where it can be easily kicked if the case is mounted on the ground.

An acrylic 3.25” bay kit was also included so that a floppy drive could be installed in the ClearPC. Keep in mind, the ClearPC comes with two 5.25” external bays exposed. Unfortunately, if you plan on not installing any external drive components (DVD, CDRW, etc), you will have a large gapping hole in the front of your case.
Breakdown
|
|
C3 Construction
The construction of the C3 case was very different from the ClearPC case. Rather than a single piece of acrylic folded around the exterior of the case from left to right, the C3 case employs a similar method along the center of the case (it is folded from the rear of the case around to the front). Two panels are then added to the sides of the case, one removable.

The process for construction on the C3 is very different as well. Almost all of the components are laser cut, unlike the ClearPC which is machine cut. The result is that there are very few edges with air bubbles or uneven cuts on them. In fact, the only edge we found that actually had any air bubbles visible was the leading edge on the front panel, along the forward removable bay.
Like the ClearPC, the C3 comes with a 3.25” bay mounting kit for a Zip or floppy drive. Also like the ClearPC, if you decide to not put any 5.25” bay devices in front of the case, you will have a large two unit tall gaping hole in the front of your case. Although not a very significant item, we would have liked to see an additional acrylic 5.25” plate on both the C3 and ClearPC for those who do not enjoy floppy drives.

C3 Construction Continued
Unfortunately the C3 case has several problems as well. Our largest problem with the case resided in the fact that the power supply mounting holes were upside down. Our provider of the C3 informed us that this problem has been corrected in future revisions of the case. Case-Mod.com does not carry any of the old revisioned cases, but if you plan on getting this case from somewhere else, we strongly encourage you to call or verify which revision of the case you are getting.
We should not have to emphasize too much as to why having an upside down power supply can be hazardous to your machine. Below you can see a picture of a side mounted fan pointing upward venting into the side of the case. We have a benchmark near the end of this review with the results of what might happen if the acrylic panels on all of these cases get too hot.

Breakdown
 |
|
C3 Features
The biggest feature on the C3 is the removable motherboard tray. We do not even think twice about aluminum and steel cases employing a removable tray. However, since the building materials and tactics are different on these cases, new tactics need to be incorporated.
Were we a little surprised when we saw the acrylic thumbscrews on this case? Well, there may be a point at which something becomes a little too excessive. Since the C3 is the only case we have with any sort of thumbscrews, we welcomed the idea acrylic or not.

We found ourselves adjusting the lights and fans inside our C3 often. Thumbscrews were an incredible time saver.
The C3 uses a single panel slot to sheath PCI and AGP devices. Similar to locking methods seen on steel cases, this single panel slides up and down to lock the expansion cards in place. It gets the job done with only using two thumbscrews, so we were more than pleased to tests out C3’s expansion bay over the ClearPC. The only problem we could see in the future is the issue of the cards popping out when the entire bracket is removed to expand more cards.

Like the ClearPC, the C3 came with cleaning solution and a few small cloths to clean the case after installation.
BeanTech BT82 Construction
Finally, we have our BeanTech BT82 acrylic enclosure. We noticed a few qualities about this case right away. First of all, we saw that the hard drive bay does not contain a single removable column. Instead, it houses a fixed column that contains 7 3.25” bays and 4 5.25” bays. After dealing with the C3 and the ClearPC’s removable column, this was an interesting welcome, at first. However, we soon noticed that this advantage proved only slightly better than the other approach. We now have to remove both side panels (4 screws each) in order to add or a remove a drive. When installing the whole system, the C3 takes a little longer. On the other hand, when just upgrading an additional drive, the BT82 takes at least twice as long.

The case came completely shrink wrapped. Additionally, there was an extra layer of shrink wrap around the case under the first wrapping. We left the inner layer of shrink wrap on the unit while we worked on this; the BT82 does not come with rubber gloves so we attempted to minimize fingerprints.

The BT82 expansion bay did not use any thumbscrews, unlike the C3 and ClearPC. This was sort of a let down, but we realized there are no thumbscrews in the entire housing. If you have a few thumbscrews lying around, you might want to substitute the plain screws that come with the case.
While on the subject of the expansion bay, we should also note the poor quality of the acrylic sheath covering the bay and the EMI shield. This small sheath is made of some other thin acrylic that does not hold with the same quality as the rest of the case. The instructions insist we use a knife to cut the acrylic out, but we found that no matter how careful we were, the acrylic always broke. A stray cable insertion would surely damage this sheath. This did not score many favor points with us.

BeanTech BT82 Construction Continued
Overlooking our incident with the EMI shield, we moved onto the power supply. We were pleased to see a bay shelf, which the other two cases lack. The additional support puts less strain on the screw mountings. Acrylic fractures very easily so keeping weight distributed becomes much more important than on a steel or aluminum case.

The BT82 also came with stereo feet. Most enthusiast cases (minus the Chenming and Casetek lines) have adopted stereo feet on their cases. Kudos to BeanTech! Unusually, BT decided to put all gold painted grills on their fans in this case. We just ended up removing them.

The forward USB and firewire ports were not as glamorous as the C3 or ClearPC. The ports are very utilitarian in look and feel, providing just the basic functionality. We have noticed that some case manufacturers have started to move the forward USB ports up, away from the bottom of the case. The ThermalTake V2000A is a perfect example of this new trend. However, since these acrylic cases are not exactly intended to sit on the floor, we will let the poor placement of the USB ports hurt our opinion of this case.
Breakdown
 |
|

Performance
We have several intensive benchmarks set up for these three cases. We plan on attempting our usual battery of audible and thermal tests on the cases.
Since the ClearPC case came with 5 ‘ColorFul’ 2500RPM LED fans and the C3 case came with none, we disabled 2 fans (one side and the top exhaust) on the ClearPC case, and then used the same 3 fans on the C3 case for the benchmark. The BeanTech case came with different fans (non-LED), so we used the same ColorFul fans in the BeanTech case as well during testing. Hopefully, we can determine a better thermal makeup of each case.
|

We should take note that we changed our setup slightly since our last enclosure review. We noticed that our heatsink/fan and power supply actually composed of the majority of the noise levels in our reviews. Zalman was nice enough to send us a new power supply and HSF (which we both saw at COMEX). Since the 7000Cu HSF is actually designed for a K8 or P4 setup, we modified our GA-7VRX by drilling a few holes in the motherboard. We do not recommend drilling holes in your motherboard.

The thermal readings for the different components during operation were as followed:
ClearPC (3 Fans)
| CPU |
Video |
Heatsink |
Mobo 1 |
Mobo 2 |
HD |
||
|
|||||||
| After 10 minutes |
42.2 |
34.2 |
33.6 |
26.7 |
27.9 |
28.2 |
|
|
|||||||
| After 30 minutes |
43.0 |
34.8 |
35.5 |
27.3 |
30.4 |
29.9 |
|
|
|||||||
ClearPC (5 Fans)
| CPU |
Video |
Heatsink |
Mobo 1 |
Mobo 2 |
HD |
||
|
|||||||
| After 10 minutes |
41.5 |
33.7 |
32.0 |
25.7 |
27.6 |
28.4 |
|
|
|||||||
| After 30 minutes |
42.3 |
34.4 |
35.1 |
26.2 |
29.4 |
29.8 |
|
|
|||||||
BeanTech BT82
| CPU |
Video |
Heatsink |
Mobo 1 |
Mobo 2 |
HD |
||
|
|||||||
| After 10 minutes |
43.2 |
35.9 |
32.9 |
26.8 |
28.1 |
28.0 |
|
|
|||||||
| After 30 minutes |
44.1 |
36.5 |
35.8 |
28.3 |
30.9 |
29.4 |
|
|
|||||||
C3 Crystal
| CPU |
Video |
Heatsink |
Mobo 1 |
Mobo 2 |
HD |
||
|
|||||||
| After 10 minutes |
43.7 |
36.0 |
33.1 |
26.4 |
29.7 |
28.1 |
|
|
|||||||
| After 30 minutes |
44.9 |
36.4 |
35.9 |
28.4 |
32.6 |
29.4 |
|
|
|||||||
Kingwin KT-436-WM (new
configuration)
| CPU |
Video |
Heatsink |
Mobo 1 |
Mobo 2 |
HD |
||
|
|||||||
| After 10 minutes |
42.5 |
34.0 |
35.4 |
25.9 |
27.4 |
27.5 |
|
|
|||||||
| After 30 minutes |
44.4 |
34.3 |
36.8 |
27.4 |
30.1 |
28.4 |
|
|
|||||||
Kingwin KT-436-WM (old
configuration)
| CPU |
Video |
Heatsink |
Mobo 1 |
Mobo 2 |
HD |
||
|
|||||||
| After 10 minutes |
54.0 |
32.5 |
38.0 |
25.0 |
28.5 |
27.2 |
|
|
|||||||
| After 30 minutes |
54.5 |
33.3 |
38.9 |
26.1 |
29.0 |
28.6 |
|
|
|||||||
As we can see, there are no benefits from acrylic cases as far as thermodynamics, but there are no liabilities either. The fans we used were only 82mm fans, and the C3 case was designed to use a 120mm for intake and a 90mm fan for exhaust. The ClearPC was able to keep reasonably cool, but competed about evenly with the Kingwin 463-WM even though the Kingwin had no side fans. The ClearPC with 5 fans performed well in the thermal test, but horribly in the sound test. Furthermore, had we used 120mm and 90mm fans on the C3 case (like specified) we would have gotten a much larger boost in performance.
Sound was recorded in decibels from 12” away from the closed case to most accurately replicate a production system.
| dBA |
|||||||
|
|||||||
| BeanTech BT82 |
44 |
||||||
|
|||||||
| ClearPC.ca ClearPC (3 fans) |
47 |
||||||
|
|||||||
| ClearPC.ca ClearPC (5 fans) |
52 |
||||||
|
|||||||
| C3 Crystal Clear |
48 |
||||||
|
|||||||
| Kingwin 436-B-WM Aluminum (new config) |
43 |
||||||
|
|||||||
| Kingwin 436-B-WM Aluminum (old config) |
50 |
||||||
|
|||||||
| ThermalTake Xaser II Aluminum Fan Low |
54 |
||||||
|
|||||||
There were several things we concluded from our heat test. First of all, we should note that the cases, on average, are slightly quieter than the Xaser II and Kingwin cases previously reviewed. Now that we have switched to slightly quieter Zalman HSF and power supplies, we can get a much better reading on the true noise levels of the other components. The 5 fan Kingwin 463-WM outperforms and stays quieter than our best performing acrylic case. In fact, it stays almost 10dBA quieter than the 5 fanned ClearPC. We attribute this to slower, better placed fans on the Kingwin enclosure.
Getting Really Hot
Another concern we had for the acrylic cases was raised when we realized the C3 had upside down power supply mountings. We were originally concerned about the panels melting if the power supply on this unit began to vent hot air directly onto the acrylic. In true AnandTech fashion, we decided to sacrifice a panel of each of our cases to determine the temperature at which each case would eventually melt. We used an industrial heat gun rated at 300 degrees Fahrenheit used at incrementally closer distances. We used a thermometer to record the surface temperature of the acrylic to determine when melting would occur.
| Degrees F |
|||||||
|
|||||||
| BeanTech BT82 |
240F |
||||||
|
|||||||
| ClearPC.ca ClearPC |
194F |
||||||
|
|||||||
| C3 Crystal Clear |
237F |
||||||
|
|||||||
| Kingwin 436-B-WM Aluminum |
N/A |
||||||
|
|||||||
Our cases can clearly handle a large degree of heat. The ClearPC website mentions that the ClearPC is constructed of Lucite, which should have a melting point upwards of 210 degrees Fahrenheit. We are not really sure why it scored much lower. Perhaps impurities were introduced into the materials while it was reformed and melted. We are still thinking of a way to melt our Kingwin case.
Installation
It came to our attention over the last few case reviews that we were not paying enough attention to the actual installation procedures of our cases. Let us take a few moments to highlight some of the ‘gotchas’ we came across in each of these cases.
ClearPC: In the construction section we mentioned that there was no removable motherboard tray. The case comes with approximately a dozen acrylic tubes that have to be used to support the board on top of the backplate. This proved to be a very time consuming process, even for us. Installation requires a little bit of wrench work, so take your time and work slow.
C3: The motherboard tray took the prize for installation of the C3. Clearly labeled, and requiring no anchoring, we flew through component assembly of this case. Unfortunately, the 5.25” to 3.25” bay converting pins were made of inferior material. If they got even a slight bit warm, they expanded and broke off inside the hard drive housing. Even screwing the adaptor a little too fast results warmth and expansion. Do not unscrew the adaptors while your hard drive is still warm. The C3 should have been our installation winner; it’s too bad a silly little 5 cent piece of metal hurt the overall installation procedure.

BeanTech BT82: Overall, installation of this case proved middle of the ground between the ClearPC and the C3. It came with instructions, but they were not as thorough as those found on the ClearPC website. A removable motherboard tray would have gone a long way for this case. As we mentioned earlier, all of the motherboard stands need to be reverse mounted and then the motherboard can be screwed in from the front. This case has an advantage of providing its own 3.25” bays without the need for adaptors.

Below is a small cross section of the assembly time of each unit we constructed. Keep in mind, we have done this a fair amount of times, and our installation times may reflect a slightly faster score than most people can obtain. We measure our assembly time from package opening to first errorless boot. The components we will be installing include three fans (the BT82 and ClearPC already had fans installed), hard drive, motherboard components, video card, DVD-RW, hard drive and 3.25” floppy drive.
| Time (min) |
|||||||
|
|||||||
| BeanTech BT82 |
37 |
||||||
|
|||||||
| ClearPC.ca ClearPC |
45 |
||||||
|
|||||||
| C3 Crystal Clear |
34 |
||||||
|
|||||||
| Kingwin 436-B-WM Aluminum |
21 |
||||||
|
|||||||
Our small benchmark shows the C3 ahead with a small advantage on installation time. The majority of their lead comes from the motherboard installation.
Score Card
Assembly: We shall interpret this category to mean actual end user assembly. Fortunately, none of these cases are kits, but that does not mean these are not difficult cases to assemble. These are very difficult cases to assemble. All three cases come with online or included instructions. However, each seems to employ non-standard techniques throughout the case. The ClearPC case allows you to configure it as you wish on their website. Therefore, ClearPC simplifies mounting fans, LEDs, and other accessories. We decided all three cases were equally tied in this category, but for different reasons. ClearPC deserves recognition because of its thorough instruction set (even though it’s online). The C3 came with a removable motherboard tray which saved a lot of time and headache over the other cases. Finally the BeanTech case did not need modified 3.25” bay mountings, which again saved headache and installation time.

Construction: This category proved a little harder to judge when we actually started to get down and dirty with the units. The ClearPC unit appears to have the most visible bubbles on the edges, but fortunately no unit has any hairline cracks in it. We found the BeanTech EMI shield on the rear of the unit cracked very easily. This component was constructed from a different acrylic than the rest of the case. The C3 and BeanTech cases were constructed of slightly thicker acrylic than the ClearPC, but all three should provide enough material for a sturdy platform. We believe the BeanTech case took a slight edge for construction even though the EMI shielding on the back had problems. Every edge was flush; we found almost no visible bubbles and no other material defects.
Features: Each of these cases came with very features. Each case comes at least with forward USB connectors. While this may have been a feature in the part, we have started to criticize cases that do not employ forward USB. The C3 and ClearPC cases also incorporate provisions for sound as well. For the most part, all three of these cases are about even for features.
Motherboard: The motherboard became the proving ground for each of these cases. The major problems we had with the motherboards included blind mounting recommended by each instruction. Without a motherboard tray, the ClearPC case seemed also impossible to mount with one person, and the screws are exposed out the side of the case as well. The BeanTech, which does not have a tray either, requires two screws for each mount point; one on each side of the platform for the motherboard. Both side panels have to be removed to accomplish this. The C3 actually employs its own motherboard tray. Albeit the implementation is not exactly perfect, regular anchor mounts can be used and the tray is clearly labeled. We were also told future revisions of the C3 case have extra holes predrilled for additional non-standard motherboards. Additional drilled holes in all of these cases of Hammer or P4 back plates would have gone a long way.
Fan and cooling: The ClearPC came with 5 fans, so it had a small unfair advantage coming into the review. When we took this down to 3 fans, we had no problems with the cooling. We were a little disappointed in the C3’s approach to fan mounting. Three different fans of different sizes are necessary for this case. We used a bit of modification and drilling to get the ColorFul 82mm fans to fit for the benchmark. We are told that the C3 design has been upgraded to incorporate more 82mm fans rather than the varying sizes.
Price: Most acrylic cases are competitively priced with aluminum enclosures on the market right now. We have seen a few aluminum cases priced in the 200USD range, but most buyers are not looking for such an investment. The C3 case was priced higher than the other two, in the 182USD range. Unfortunately, this case does not come with many extras, so a power supply, fans, and probably a light kit will run additionally.
The ClearPC case comes at 100USD standard, but unfortunately needs to be shipped from Canada. Their website allows you to add and configure your case online, which will save you money in the long run. Investigate the actual shipping charge for your case if you plan on buying from ClearPC; saving money on the configuration could be nullified by large shipping charges. If you live in or near Canada, however, ClearPC might take an easy lead for price. As configured and shipped the US, the ClearPC we reviewed would run about 182USD as well.
The last case, the BT82, retails for about 160USD and comes with 3 fans. Again, you will need to buy a power supply for this case as well. We were happy that the case did come with at least three fans, which the C3 does not. However, these are not LED fans, so you may end up replacing these fans with something a little more exotic. The UV sensitive version of this case retails for a little more.
Final Words
Looking at clear enclosures over the last few months revamped our original opinions on clear cases. It is very clear that these cases are not geared for the beginner system builder, even with ClearPC’s online configuration. They require a lot of work to keep clean, a lot of care as to not fracture the housing, and a lot of time to put together. On top of that, they cost a lot!
But, as the advocate would argue, they provide a unique enclosure that really can not turn heads like a traditional metallic case. Once we had our cases together, we had no complaints about noise, performance or versatility. Cleaning does get annoying, but if you assemble your case properly with few fingerprints, and keep the case high enough off the ground to prevent dust build up, the frequency to clean the case is diminished.
All three of these cases provided something a little different to the acrylic market. Overall, however, we decided to choose the BeanTech BT82 as our clear champion for the following reason:
- The BT82 provided a slightly easier installation than the ClearPC. Even though the motherboard was not as easy to install as the C3, the drives, power supply, and fans were.
-
The BT82 used standard 82mm fans throughout construction. The ClearPC employs 82mm fans as well, so we should mention them as well. The C3 annoyed us slightly for only have three fan mounts, two of which require odd sized fans. Perhaps had they included fans we would have thought differently.
-
Front panels; the BT82 comes with all of the front panels, rather than leaving any missing.
-
Finally, the BT82 provides the best blend of sound and thermal reduction as noted in our benchmark.
The BT82 is not a perfect case; the EMI shield in the rear is particularly annoying. The C3’s thumbscrews laid waste to small Philips screws on the BT82, and the ClearPC really provided better thermal properties (at the cost of louder noise). Furthermore the BT82 did not have forward sound connections.
All in all, we hope our clear chassis shootout provided a fair amount of insight for any future acrylic modders out there. Special thanks to ClearPC.ca for supplying us with the ClearPC, Case-Mod.com for providing us with the C3 case, and finally Directron.com for providing us with the all around leader BeanTech BT82!


